Disclaimer: my detail brush is extremely frayed, so this is actually worse than it would normally be! Here we go!
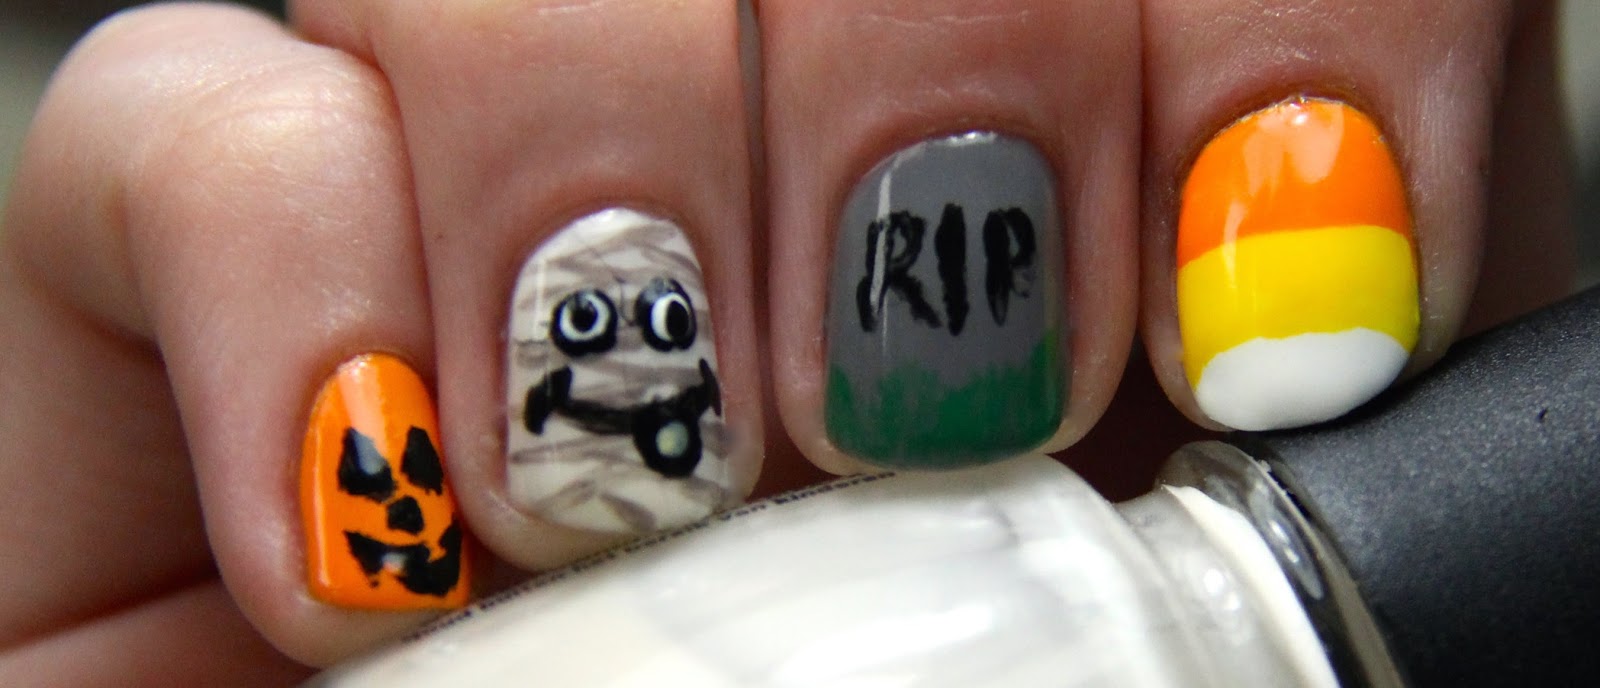
So here are my four ideas. Starting from left to right, I'll walk you through what I used and what I did!
Let's start off with all of the polishes I used:
- Sharon by Zoya
- Posh by Revlon
- Sunshine Sparkle by Revlon
- Superstar! by Pure Ice
- Black Satin by Rimmel
- Happy Go Lucky by China Glaze
- Recycle by China Glaze
Note: All of my nails got a coat of Gelous Advanced Nail Gel Coat before I started.
Jack-o-Lantern: To start off I used two coats of Sharon. Once that was dry enough, all I did was draw on my face using a tiny brush and Black Satin. Finally, I smoothed it all over with a coat of Seche Vite.
Mummy: This nail is the most complicated and has the most steps. I started off with three coats of Oxygen. I chose this because I didn't want the bandages to be stark white; I wanted them a little yellowed. Once that was dry, I drew on my bandages with a tiny brush and Recycle. Next, I used a large dotting tool and dotted on Black Satin for the outline of the eyes. Then, for the whites of the eyes, I used Superstar! to make a slightly smaller dot. To finish off the eyes, I used a small dotting tool and dotted on Black Satin once again. Using a tiny brush, I drew on the mouth and the outline of the tooth (which really looks like a tongue). The yellow colour inside the tooth is Sunshine Sparkle by Revlon, dotted on with a small dotting tool. The whole nail then got a coat of Seche Vite!
Gravestone: Two coats of Recycle started off this nail. After that it was as simple as drawing on the letters with a tiny brush and Black Satin, and then using that same tiny brush and Posh to draw on the grass! I finished off this nail with a coat of Seche Vite.
Candy Corn: I started off painting my entire nail with Super Star! Next, I painted on a thick curved stripe of Happy Go Lucky, followed by another thick curved stripe of Sharon. To finish up, I smoothed on a coat of Seche Vite!
I hope you find some inspiration from my quick and easy Halloween nails! Maybe you're better at nail art than I am and can even build upon these ideas! I'd love to see photos of your spooky manicures!
xo
No comments:
Post a Comment