Thursday, November 6, 2014

A Foray into Prestige Cosmetics!


Hey loves! Recently I've had a desire to expand my horizons and try out a new cosmetic brand. In my research I came across Prestige Cosmetics! I tweeted them to ask what the essentials were from their brand that I needed to try. They answered and suggested I try three products. Let's talk about them!


The first thing they recommended was their Smoky Trio Eyeshadow, which retails for $9.00. I love the packaging on this, it's super sleek! As you might guess, there are three shadows here: a shimmery ivory, a shimmery grey brown, and a matte black. These are all very different, so I'm going to talk about them separately.

The ivory is a little underwhelming for me. The shimmer is nice but I don't find it very pigmented to the point where I can barely see it when I swatch it. It took me several passes for me to even get it to show up in the swatch above. It's also a very hard shadow which makes it difficult to get much at all on my brush, which might add to the pigmentation issue for me. Primer does help a little, but I wish I didn't have to use it. All in all, it's very pretty, but I wish it were much softer and more pigmented.

The grey brown is a colour that reminds me of mushroom. It has a beautiful silver shimmer to it. I love its uniqueness! This is definitely the best shade out of the trio. It's not the softest shadow I've ever tried, but it's a million times better than the ivory! This shadow is nicely pigmented. One pass has great colour payoff but it also builds extremely well! I sometimes find this a little powdery so you might want to give your brush a tap, just in case.

The black is your standard matte black. This is also pretty hard and isn't the most pigmented matte black I've ever used, but it builds okay and you can get the job done. One again, primer does help this out a bit. I do find this a little powdery sometimes too, so a brush tap might be good!

All in all, I like this trio okay. As much as I do like the packaging, the product inside counts most. The ivory is disappointing, the black is decent, and the grey brown really saves it for me. I have definitely paid less for better shadows. I think the biggest issue it has is that the shadows are just so hard. A creamier formula would go a long long way!


The next product they suggested I try was their Line & Style Ink Pen. The shade I got was Black Shine, but that is the only shade available as far as I can tell. You guys, I love this. I just love it. The packaging is a pretty standard glossy black tube. Towards the business end there is an ergonomic matte gripper, which is a nice touch. The actual pen tip itself comes to a very fine point and is quite flexible!


It's extremely black and it is very easy to vary the thickness of your line using that very flexible fine tip. The tip gets nice and wet so the application is not patchy, though not so wet as to pool product on your skin. It doesn't bleed even a little bit either! It takes a few seconds to set, but once it does it is there until you decide you want it gone. The finish is as it says: a nice glossy black! This eyeliner costs $9.00 and I think that is an extremely good price for one of the best liner pens I have ever used!


The last item I bought to review is the Makeup Eraser Pen, which also retails for $9.00! I was extremely interested to try this out! Everyone goofs up on their eyeliner or gets mascara where it doesn't belong once in a while. This eraser pen has standard glossy black packaging and a chiseled tip which offers the precision that a cotton swab just can't! But how well does it work?

What better way to test an eraser pen than on pure black makeup! As you can see, it does a great job! It's pretty clear that this pen works best erasing little mistakes and not your entire line of eyeliner. The tip does retain the colour you remove, especially black, so you have to wipe it off a few times to get all the excess off and not smear colour all over your skin. I do really really like both the idea and the execution and can see myself using for those little goof ups! If you're tired of removing more makeup than you wanted to with a cotton swab, you should definitely pick this up!

To give you an idea of how these products come together, here is the look I created using the trio and the eyeliner! I really like how that grey brown shadow adds just a little bit of warmth to the smoky eye!

So, all in all, my first experience with Prestige was mixed, but mostly good. I loved the eyeliner and eraser pen and would definitely recommend those, but the trio was kind of a let down. It did get the job done, though. I would love to try out some of their other shadows to see what their formulas are like! The brand is quite reasonably priced and you can find it at most drug stores and Ulta! You can also buy directly from their website and get free shipping on orders of at least $25!

Have you guys ever tried Prestige? If you have, what did you think of what you've tried? If not, would you?

xo

Wednesday, November 5, 2014

NOTD: China Glaze Oxygen and White Cap

Hey loves! I thought I'd sneak a late post in on my off day!
I've been wearing a heck of a lot of dark vampy colours for fall and wanted to mix it up a little bit with something a little less... harsh. I decided I wanted a soft cream and so I grabbed for China Glaze's Oxygen. Three coats of it later, I was almost satisfied but wanted to jazz it up a little more. White Cap made the perfect topper for an accent nail! I love this manicure! It even gets me just a little bit in the holiday spirit! ;)

xo

Tuesday, November 4, 2014

A Haul! a.k.a. I spent HOW much?!?

Hey loves! So, I haven't really gone and had a good shop lately. I've bought things here and there and mostly online, but for me it's the process: walking up and down every aisle, putting things in your basket... sometimes deciding you really didn't need that sixth pink nail polish after all and sometimes just impulsively buying everything you lay eyes on. Ahhhh, it's just... It's therapy.

So anyway, I had a retail therapy itch that needed scratching, and, oh, did I ever scratch it this past weekend. Let's take a boo at what I bought!

My first stop was Ulta!

 
I stopped into the high end section first and picked myself up a little holiday gift set from tarte! It's the Away Oui Go Portable Palette and Collector's Set (an Ulta exclusive). I've never really tried tarte and I always wanted to, so I figured a holiday set would be a good foray into the brand! There's a lot of value packed into this little box! There are four interchangeable cheek and eye palettes, three lip glosses, a mascara, and an adorable little quilted compact in which to put the palette of your choice! All of this good stuff is only $48! I'd love to show you the inside but a review of this is coming very soon, so this is just a sneak peek!

Next up is an older China Glaze gift set from the Off Shore collection this past summer. This four piece set includes Seas The Day (an almost-red pink creme), X-Ta-Sea (a cool toned grape purple creme), Wait N' Sea (a bright aqua creme), and Be More Pacific (a light yellow-green). I can see myself wearing all of these colours and I definitely didn't mind spending only $14.95!

I, of course, had to take a peek in the clearance section and ended up grabbing a few more nail polishes. Ulta's own Blues Cruise is sapphire glitter packed in a sapphire sheer base. Great for layering or making opaque on its own! I paid $2.97 for this beauty. Zoya's Harper, from this summer's Bubbly collection, is a bubblegum pink packed with shimmer and iridescent glitter. I rang me up $4.50. Finally, I picked up Muir Muir on the Wall by O.P.I. It's from their San Francisco collection way back in 2013 and is a blackened plum with a hint of golden duochrome to it. This cost me a whopping $2.39.


The last thing I need is another lip balm, but after hearing so much about Rachel Roy's collaboration with eos for the holidays, I had to check it out! I really wanted to try out the trio but Ulta was sold out. Instead I picked up the scent Barbados Heat Wildberry and it smells amaaaazing! To me it smells like strawberries and cream in the best way! This was $3.49.

I was all out of the Rimmel Match Perfection 2-in-1 Concealer & Highlighter that I recently featured in my October Favourites post, so I went ahead and grabbed another one for $5.99!

Finally, I've been itching to try a new brand. I tweeted to Prestige Cosmetics and asked them what they recommended I grab to try out, and I took their advice! I ended up getting their Smoky Eyeshadow Trio ($8.99), their Line & Style Ink Pen in Black Shine ($8.99), and their Makeup Eraser Pen (also $8.99).

Still with me? Good! There's more!

My second and final stop was Walgreens. I only went in to grab a few things, but there was just so much makeup on clearance. I got really distracted but tried to be really good! Here's what I got!

I needed a new bottle of acetone, so I got one! Nothing exciting. Normally I go to Sally and get a bigger bottle, but it was Sunday and they weren't open yet. This was $5.49, which is ridiculous, but I needed it.


Next is a Sally Hansen French Manicure White Tip Pen. I've been looking for an easier way to do a french than guide stickers, so let's see how this goes! I picked this up for $7.29. Sorry it's not in the package for the picture, I got ahead of myself!

A clearance item I did pick up is the Rimmel Show Off Lip Lacquer in Nova. This is a very very pigmented but still not thick or sticky. It smells fruity but in a nice way. I'm very excited to try this out and I'm sad I didn't pick up the other shades as this was only $2.79!

I also picked up a double sided eyeshadow brush. I use the angled side to clean up my manicures. Again, not exciting! This guy was $6.79. I was fairly sure the price was cheaper on the rack, but that's what I get for not paying attention.

If you know me at all, you won't be surprised that I picked up two nail polishes! Both are from Revlon. Urban is a navy blue (almost blurple) creme, which I have just been craving for fall. This was a very reasonable $4.99. I also grabbed Elusive, which has a black base packed with purple shimmer and larger teal glitter. A test coat on my nails showed that this dries matte! Super cool. This polish was on clearance for $2.89.

Alrighty, I saved the best for last! You might have seen the buzz around the beauty blog universe that there are $1 eyeshadow palettes to be had! I couldn't resist picked up three out of the four that were there. There were a LOT of value makeup items there for the holidays, so you should definitely check them out. They're great for stocking stuffers! Anyway, these are the Twinkle Twinkle eyeshadows from Profusion Cosmetics. You get an incredible amount of product and the eyeshadows are actually really great too! You can bet there will be a review of these very very soon!

Thanks for sticking with me guys! There's lots of good stuff coming on my blog really soon and I can't wait to share it all with you!

xo

My Girl Liz Earle!


Hi! So I've ordered some goodies from some very well known personalities in the British YouTube community and am anxiously awaiting their arrival so I can try them out and review them for you! While I'm (not at all) patiently waiting, I wanted to talk about another beloved product from the UK that has easily earned its place in my daily skincare routine! I am, of course, talking about the Liz Earle Cleanse and Polish Hot Cloth Cleanser! Quite the mouthful!

I realize I'm very late to the party discovering this, but for years I used nothing but the proactiv cleanser. My skin is usually... unhappy, to say the least. I started having problems when I turned 18 and proactiv was the only thing that worked for me. Since then I have been too afraid to wean myself off of it, but I recently ran out and decided to go for the gusto and try something new.


Here are a few photos of the starter kit I purchased. The cleanser itself is 3.3 fl oz and there are two enormous muslin cloths, along with a cute little travel case!

There's a lot of good stuff in this cleanser, such as eucalyptus oil, chamomile extract, and rosemary extract to name a few. It smells very much like eucalyptus and has a thick, creamy texture. To use it you massage a small amount into your skin, leaving your eyes until last so you don't spread eye makeup all over your face. After that, take the muslin cloth that comes with it and hold it under hot water to get it nice and warm. Squeeze out the excess water and wipe off the cleanser. I like to use the rougher texture of the muslin to get in a good exfoliation. You might need to reheat the cloth a few times as you go. Finally, splash your face with cool water to close up your pores and you're done!

There are so many reasons I love this cleanser. It leaves my skin feeling very naked and clean, but it is not at all drying. My skin doesn't feel tight or scream at me to put moisturizer on it right away. It just feels baby smooth! It does a pretty good job of removing eye makeup, but you might need to supplement with something else if you tend to be heavy on it. The BEST part of this cleanser for me, though, is that my skin is perfectly happy and behaving. No longer do I need to slather drying benzoyl peroxide on my face! No longer do I need to worry about bleaching my towels!

If you've been on the fence about trying this, I would suggest you go ahead and take the plunge. I thought I would use proactiv for the rest of my life but I am a changed woman! This stuff is fun to use because it just feels luxurious, and it's very reasonably priced! A 3.3 oz starter kit, which includes two muslin cloths, is only $24.50! It's worth every penny!

If any of you guys use anything you think would top this, please let me know about it!

xo

Sunday, November 2, 2014

October Favourites!

Holy moly, where did October go? I hope you all had a lovely Halloween and are currently in a blissful sugar coma! The best part about the beginning of November? Cheap Halloween candy! And, of course, my October favourites! Here are all the things I loved in October!


Rimmel Match Perfection 2-in-1 Concealer & Highlighter: So here's something about me: I don't wear foundation. I just don't like it and don't really feel like it's necessary for me. However, there are some areas of my face that need a little covering (I have red cheeks), so for that I turn to my old friend Rimmel. This concealer comes in a squeeze tube with a brush applicator. It's got great high coverage without feeling too thick and heavy.  It's also great for under the eyes and to smooth over redness, and in general to make your skin tone nice and uniform. Best of all, it's cheap!


Liz Earle Cleanse and Polish: I was sent a sample of this in a Birchbox and was so excited to see it in there. Every British YouTuber/blogger I had ever seen had sung its praises and so I was more than glad to hop on the bandwagon! I tried it, loved it, and bought a full size. I have a post coming very very soon so you to get a full idea of why it made my list!


SeaRX Birchsap Moisturizing Lotion: After finding a great new cleanser, I was inspired to find a great new moisturizer! This is a great, lightweight everyday moisturizer. It smells like lemon and does a great job delivering moisturizer without making my skin too oily. It behaves very well under makeup and just generally leaves my skin feeling fresh, smooth, and not too heavy.


Palmetto Derma Collagen Booster & Restoration Serum: I have just very recently come across this in my October Boxycharm and it is my first serum. Since I am on such a skincare kick lately, I was really wanting to add a serum into my routine, and Boxycharm dropped one from the heavens and into my lap. This stuff makes my skin feel super soft and smooth and is a quick and easy step to use under my moisturizer. While I love this, I really don't have anything to compare it to, and it is rather expensive. I will be on the lookout for something I love just as much for when this runs out!


Dunkin Donuts Pumpkin Spice Coffee: Being from Canada, I'm used to the crisp, cool fall air beginning in September! Now that I live in North Carolina I have to resign myself to the fact that I have to wait longer. It's still rather warm here, aside from a few random days. In a bid to try and force fall upon me, I started wearing dark nail polish and bought pumpkin everything. This coffee is the bomb, I like to put it in my reusable K-Cups! It's definitely helping me to get in the fall mood!


Bath & Body Works Three Wick Candle in Pumpkin Hayride: I really really want it to feel like fall, guys. What says fall like pumpkin? This smells amazing and not at all overwhelming. I don't need to tell anyone how great Bath & Body Works candles are, we all know. I'll be so sad when this is gone.

Bonus! Beauty Boxes: I don't think I'll ever stop wanting to try more subscription boxes. It's like Christmas every time I get one and I love trying out new products I would have never otherwise picked up for myself. In addition to the three I already subscribe to, I've also recently purchased the Wal-Mart and Target boxes and am eagerly awaiting their arrival. If my husband wouldn't kill me, I'd try them all!

So that's it! I've found a lot of great new products and things to love this month and I'm hoping next month is just as exciting! What have you guys loved or even hated in October? Let me know!

xo

Friday, October 31, 2014

My Halloween Manicure and NOTD!

Two posts in one day! I know, I know. Think of it as a Halloween treat!

This is just a quick post to show you what I have on my nails today, right at this very moment!


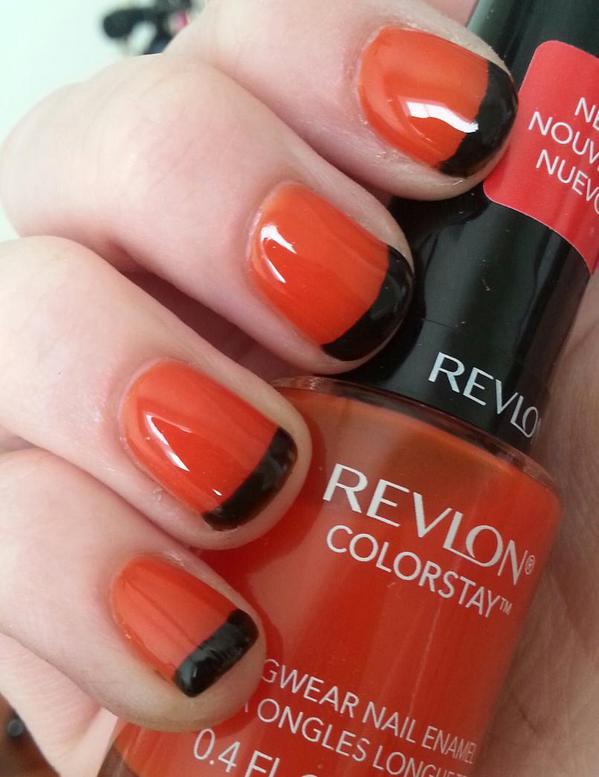
Ta-daaaa! I opted to keep it simple this year and just go for a funky french. If I could rock some nail art, I sure as heck would, but as you might have seen by my last post, it's not exactly my forte. This mani was so simple! Two coats of Revlon Colorstay in Sunburst, a stripe of Sally Hansen Hard as Nails Xtreme Wear in Black Out, and then a coat of Seche Vite. Hope you all like it!

xo

Easy Halloween Nail Art!

Happy Halloween everyone! Whether you go beg candy from your neighbours or not, I hope you all have a great evening! If you're like me, you have no costume or plans to go out, but want to do something to get in the Halloween spirit! Also, if you're like me, you're extremely bad at nail art. Fear not, for I am going to show you my extremely bad nail art to give you some easy and festive ideas for your nails!

Disclaimer: my detail brush is extremely frayed, so this is actually worse than it would normally be! Here we go!


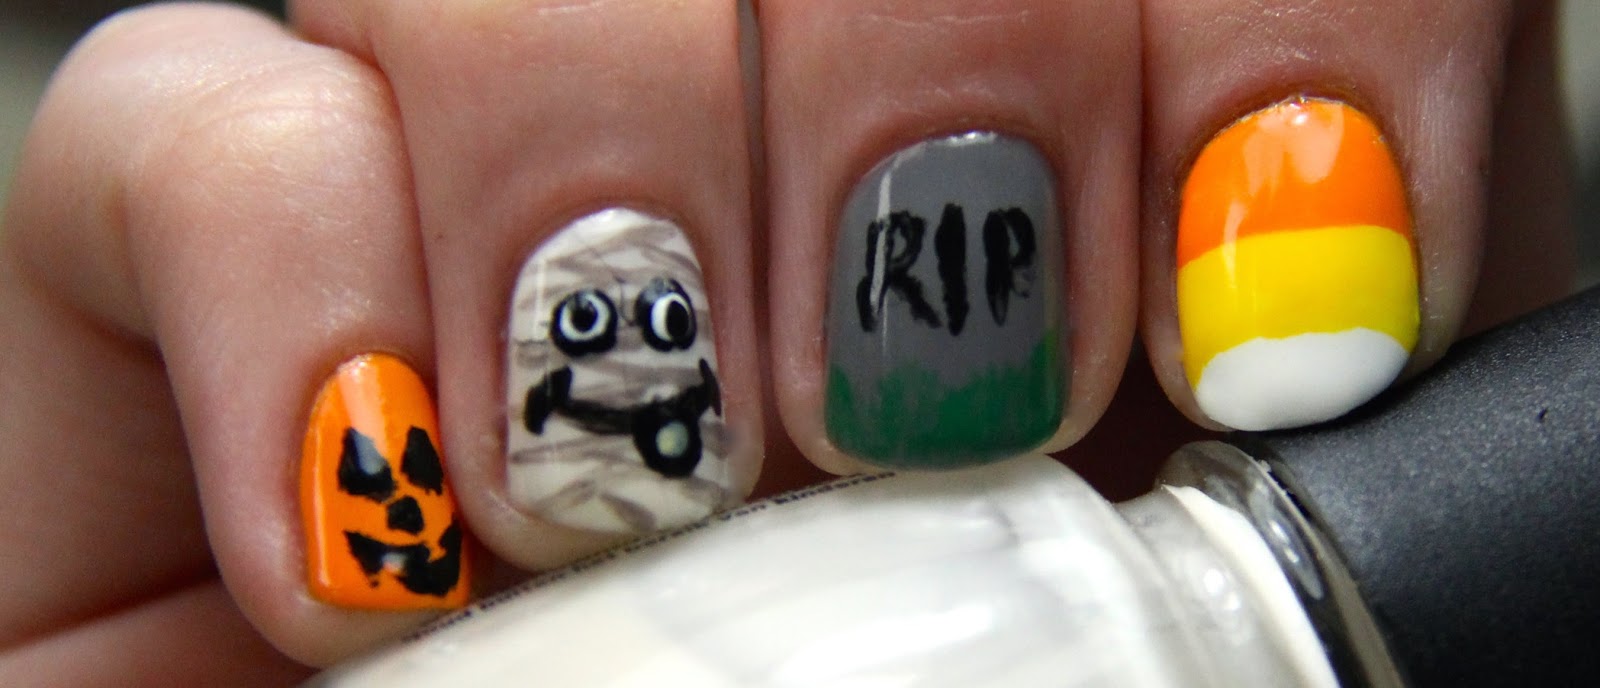
So here are my four ideas. Starting from left to right, I'll walk you through what I used and what I did!

Let's start off with all of the polishes I used:

Note: All of my nails got a coat of Gelous Advanced Nail Gel Coat before I started.

Jack-o-Lantern: To start off I used two coats of Sharon. Once that was dry enough, all I did was draw on my face using a tiny brush and Black Satin. Finally, I smoothed it all over with a coat of Seche Vite.

Mummy: This nail is the most complicated and has the most steps. I started off with three coats of Oxygen. I chose this because I didn't want the bandages to be stark white; I wanted them a little yellowed. Once that was dry, I drew on my bandages with a tiny brush and Recycle. Next, I used a large dotting tool and dotted on Black Satin for the outline of the eyes. Then, for the whites of the eyes, I used Superstar! to make a slightly smaller dot. To finish off the eyes, I used a small dotting tool and dotted on Black Satin once again. Using a tiny brush, I drew on the mouth and the outline of the tooth (which really looks like a tongue). The yellow colour inside the tooth is Sunshine Sparkle by Revlon, dotted on with a small dotting tool. The whole nail then got a coat of Seche Vite!

Gravestone: Two coats of Recycle started off this nail. After that it was as simple as drawing on the letters with a tiny brush and Black Satin, and then using that same tiny brush and Posh to draw on the grass! I finished off this nail with a coat of Seche Vite.

Candy Corn: I started off painting my entire nail with Super Star! Next, I painted on a thick curved stripe of Happy Go Lucky, followed by another thick curved stripe of Sharon. To finish up, I smoothed on a coat of Seche Vite!

I hope you find some inspiration from my quick and easy Halloween nails! Maybe you're better at nail art than I am and can even build upon these ideas! I'd love to see photos of your spooky manicures!

xo